Tuesday 27 November 2012

Sometimes One Just Isn't Enough

I often find myself saying that about biscuits! However I've noticed recently that I do the same with crafting. When I'm looking for ideas I'll do a Google image search or browse Pintrest and soon I'm wanting to make about 10 different versions of the original search item. This is what happened with the wreath!

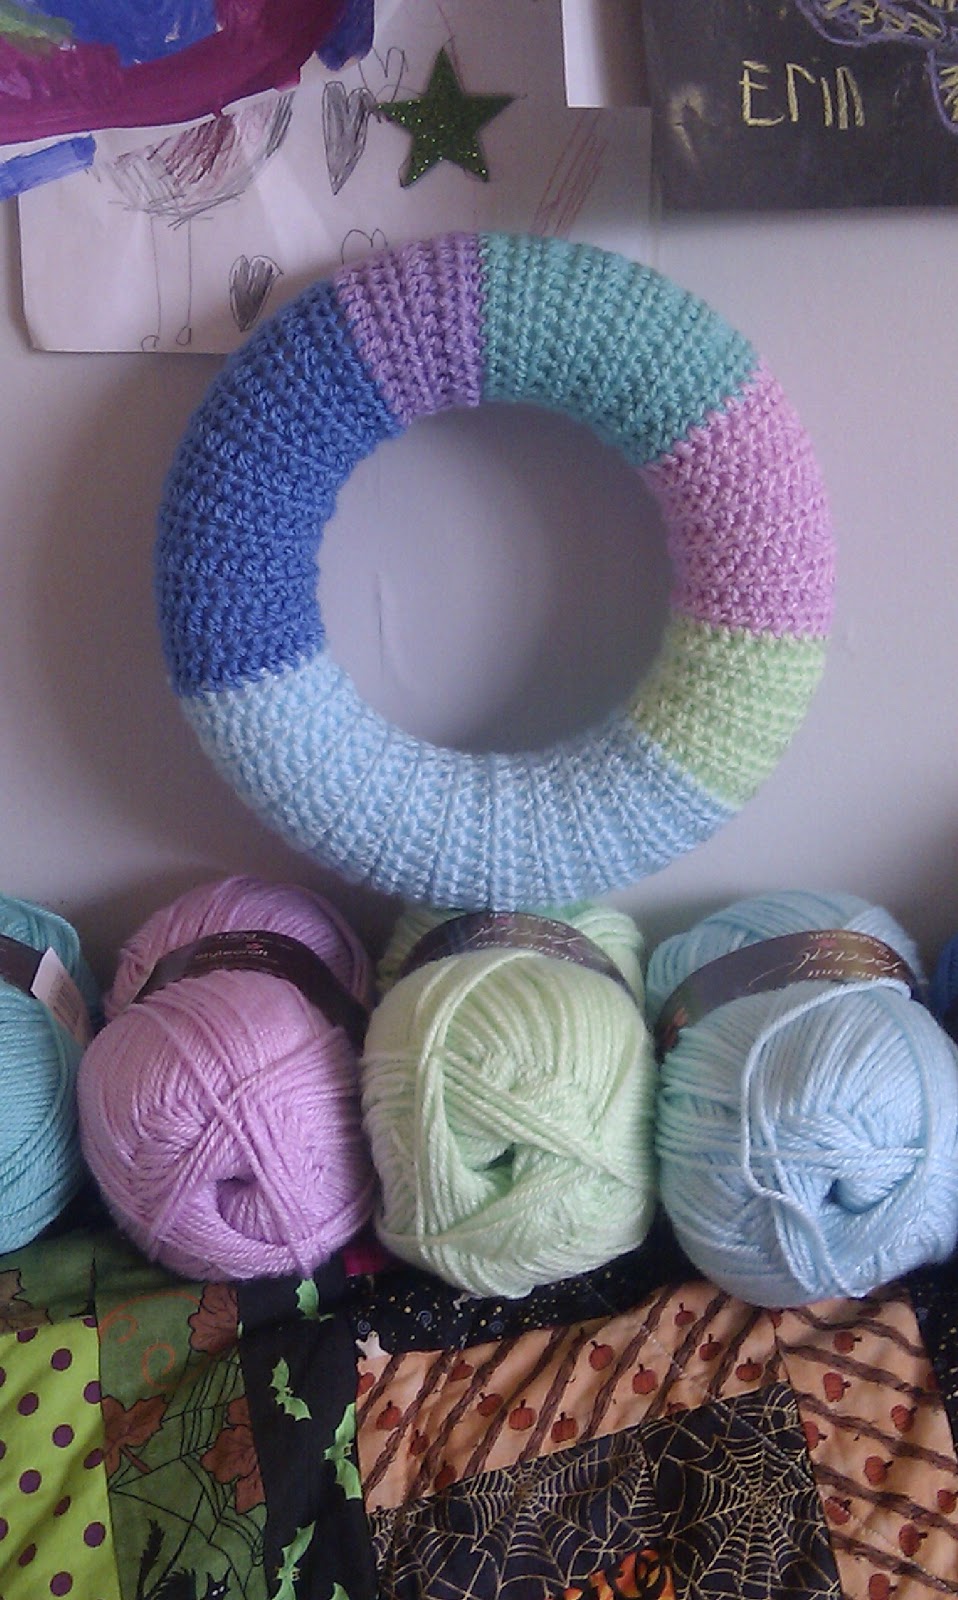
I did a few searches for ideas for a wreath for Christmas. I found various ideas and just couldn't decide what to make. I love the ones wrapped in yarn. I also would love a felt ball one. Tbh I actually did decide to make one of those but then I worked out that it would take me hours to make all the balls and I really don't have time for it at the moment (assignment deadline looming!).

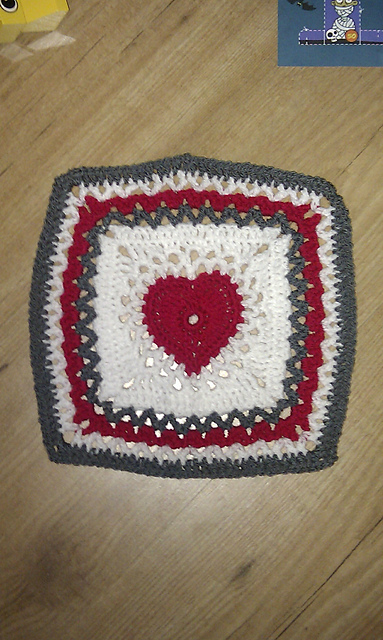
Luckily the crocheted one I made wasn't Christmassy (I've probably made that word up) in the traditional sense so I'll be able to leave it up all year round. I did need a Christmas one though. Do you remember this fabric I showed you


Well, in combination with A LOT MORE little squares, it's been turned into a lovely Christmas wreath.


I ended up in Hobbycraft looking for the polystyrene ring. My husband was supposed to pick some up for me from a craft shop in town but he forgot. When he went on Saturday, while I was at a tutorial, it turned out they hadn't even had the sizes I wanted delivered, which is how I ended up at Hobbycraft for them. I couldn't wait any longer as I had some time to make it on Sunday afternoon.

I'd decided on the biggest size they had (35cm) and at about 4pm I was cursing my decision as I cut more and more 3" squares and kept spotting more white polystyrene through the fabric. Eventually though, it looked totally covered and I love it.

It's super easy to make (just lots of cutting!) by poking the fabric in with a screwdriver. I followed the tutorial on the RosMadeMe blog.

Oh and in Hobbycraft I picked up yet another polystyrene ring so that I can make a yarn wrapped wreath too!

Pattern: Simple Leaf

As I promised the other day. Here's the pattern for the leaves I used on the wreath.


I've included photos to help explain. Let me know if it's not clear!

I have used US crochet terms throughout. Leaves were made using Rowan handknit cotton on 4mm hook.

Leaf:

ch 6


Sl st in 2nd ch from hook, sc in next ch, hdc in next ch, dc in next ch


Your work should now look like this!

In the next ch (this will be the one nearest the knot) make the following stitches:
tr, dc, hdc, sc, hdc, dc, tr

Do not cover the tail end of the yarn
This is what it looks like after the sc

And this is when you have done all the stitches in that ch

From the back - tail end should stick out
You will now work back along the other side of the chain.
dc in next ch, hdc in next ch, sc in next ch, sl st in last ch


It should now look like this
You now need to make an extra slip stitch (see picture below for where to make it). It is fairly obvious when you've got to this stage where the loop is but it's basically the side of the original turning chain.


Now tie the yarn off and leave a long tail. Your work should look like the pictures below.


When you start to sew in the end of your yarn make sure to take it through the back loop of that stitch that is sticking up at a funny angle.


Just like this!

Sew in the end so that it comes out at the same point as the other end


You can now use these two ends to attach the leaf to the wreath (or whatever else you're making) before weaving the ends back along the leaf to finish off.


Monday 26 November 2012

Update: Wreath

Here's a little update on the crocheted wreath. I have done the flowers and am planning on making the bird next week at sewing (where I have access to the pattern).

Some of the flowers are done in a pattern I use regularly for flowers. I can't even remember where I got it from. Others are done in the May Rose pattern on the Atic24 blog. The leaves are my own design and I'll post a tutorial soon. I can write out the pattern but it will make more sense if I have pictures to explain a couple of parts to it.


Messing Around With The Kids

The other week I bought a bunch of craft stuff from Baker Ross. Honestly, I could spend a fortune on that site. There's so many things that look like great fun and there's a good range of stuff for younger kids. I can't show you most of the things we made as they've been wrapped up for Xmas presents for relatives but I had to show you these:


They were done with marbling inks. It's pretty simple to do, just adding a few drops to a clean bowl of water then dipping the polystyrene shapes in.

Unfortunately the kids went a bit mad with adding colour and it wasn't helped by me accidently tipping half a bottle in when the lid fell off. Consequently they were done a week ago and still aren't dry! They may have to be presents for next year at this rate.

Some did look lovely though


Wednesday 21 November 2012

WIP Weds: Wreaths & Other Xmas Decorations

It's definitely feeling a lot closer to Christmas now. We have family visiting for the next 3 weekends. I'm making a start on more Christmas decorations but, as ever, my head is full of things I want to make that I just don't have time to do! I'm trying to be realistic with the time I have.

So, first up I whizzed this jar cozy up yesterday afternoon. I'm planning on adding some extra detail to it, perhaps a little wreath. I was going to do a wreath by crocheting around a circular curtain ring but I can't find where I've put them so may have to come up with an alternative idea.


I also grabbed a bunch of scraps and made up an Attic24 Bauble Decoration. Mine are a little different because I didn't have any beads with a big enough hole and I decided not to add the buttons as I wasn't adding the beads.


I made a second one later that evening while Alan put the kids to bed. It really is a quick make and a good way to use up scraps.

I'm not sure why but this year I have a bit of a thing for wreaths. We don't really have a very good door for wreath hanging so I'm going for indoor wreaths! These little squares are going to be used to make the gorgeous Ragtime Christmas Wreath on the (fantastic!) RosMadeMe blog.


I have a fair bit more cutting out to do and I can't put it together yet as the shop I was going to get the polystyrene ring from was out of stock until later this week. Fingers crossed they'll have some on Thursday.

In the meantime I started a crocheted wreath. This is done over a 17cm full polystyrene ring using the method Lucy described here in her May Rose Wreath Ta-dah! I haven't decided yet what I'm going to decorate it with. I'm currently thinking a few flowers grouped together on the edge and a bird hanging inside. I do have memories of sewing a hanging bird decoration last year and it was incredibly fiddly, so I may change my mind!


This is done in Stylecraft Special DK in the following colours:
Aspen
Clematis
Spring Green
Sherbert
Aster
Wisteria


Joining in with Tami's Amis. Check out lots more WIP posts!

Tuesday 20 November 2012

FO: Little Hug Blanket (includes pattern for squares)

Last week my husband had to work in London for a couple of days. Luckily for me, it was Thursday and Friday. Both girls are in school all day on those two days and they were fairly tired afterwards, particularly Orla. It meant both were in bed asleep by 7pm so I got two extra evenings of peaceful, free time. I managed to finish off the 20 squares I was making from leftover yarn, join them together and add a simple border.


These squares are so easy to do and give a more solid look to a blanket than a traditional granny square. So here's some (basic) instructions using US terms (brits can just substitute every dc for a UK tr):

Make ring:
ch4, sl st into first stitch to form ring

Round 1:
ch3 (counts as first dc), 3dc, *ch2, 4dc*, Repeat from * to * two more times, ch2, sl st into top of ch3 to join

Round 2 and each round thereafter:
ch3 (counts as first dc), *dc in each stitch across, in corner space make 2dc, ch2, 2dc*,  Repeat between * and * all the way round, join with sl st to top of ch3
Note: You will not end in a corner space - the number of stitches after the corner space will depend on which round you are on.

When square reaches desired size tie off and weave in ends.

I used 5 colours and made four 6" squares in each. I arranged them randomly and joined them using the slip stitch method (put them right sides together and slip stitch through the back loops i.e. the loop closest to you and the loop furthest away).

For the border I did a simple US sc in each stitch around and 3 in each corner.

Excuse the feet in the picture!

Tuesday 13 November 2012

A Bit More Crochet

Mainly using up leftover yarn at the moment. All the following are for the WoollyHugs cause.

One of the things I'm loving about this project is that I have a good excuse to try new squares and adjusting patterns. It's something I very rarely do for personal projects because I like to just get on with things but making things that someone is going to get so much pleasure from makes me put in more effort than usual.

First of all I decided to use this Centre Heart Square pattern. I was using DK yarn rather than Worsted so knew it would come out smaller than the 12". I managed to make it 10" by missing the last row.


I then made some 5" plain squares and some 5" squares using this Flower Granny Square pattern and some using this pattern, also called Flower Granny Square (confusing, eh?)


As you can probably tell from the above picture I've joined it all into a blanket and put a border on. Unfortunately the central square was a bit baggy and I was hoping that adding the other squares round it would pull it all out into shape nicely but it's made the other squares look odd too. It's a bit late to frog it so I'll send it in and hope someone likes my wonky, saggy blanket!

I've also made a square with the More V's Please pattern for a memory blanket. This is a 12" pattern but I followed the instructions up to and including Round 7 and then added a round of US single crochet to make it 6" square.


I've started on another plain-ish blanket made with the leftovers from the Christmas present blanket I made. 4 squares done this afternoon and I'm hoping to get 20 out of my leftovers. Fingers crossed.

Thursday 8 November 2012

FO: Blanket No 2

Well I managed to get the blanket finished the other day. We were having a party on Sunday evening and it was the push I needed to get on with sewing the ends in and doing the border so that it could go out of the way. In the end I decided to do a fairly plain border, mainly because the other blanket has no border and I didn't want one to look lots fancier than the other.

So here it is:


I used a crab stitch (also called reverse single crochet) for the edge


I also managed to make lots of cakes for the party. I did some Apricot & Banana Muffins and some Vanilla Cupcakes:


And we carved the pumpkins to sit on the table: